
There are times when we want to change our default settings to the ones we want, to improve the graphic representation and performance of our system.
Well, I'm not an expert, but I'm assuming since the NVIDIA Control panel only shows 3d settings, it's not utilizing my dGPU. Secondly, when I use my alienware graphics amplifier with an external monitor attached while using my laptop monitor at the same time, and go to display settings to view the two different monitors settings, I press 'Detect' and it says it cannot detect multiple monitors.
Today, in this article, we well be talking about some of the best NVIDIA Control Panel settings on Windows, to improve the systems performance in various ways.
Starting now!
Best NVIDIA Control Panel Settings For Windows 10, 8, 7
1. How to Disable NVIDIA PhysX GPU acceleration?
NVIDIA PhysX is an intelligent physics real-time engine that comes with more than 150 games and is used by a lot of developers. This middleware engine provides a boost to the physics processing power that makes gaming physics more effective.
But, if you are playing a game on low processor with a good GPU, you should disable the NVIDIA PhysX from the control panel, to decrease the load from the processor.
Here are the steps for disabling NVIDIA PhysX GPU acceleration from control panel:
1. On Windows Desktop, right-click and choose ‘NVIDIA Control Panel’ from the side menu.
2. Now, from 3D settings on left side, select ‘Set PhysX configuration’.
3. Now on the right panel, in option ‘Select a PhysX processor’, choose ‘CPU’ from the drop-down menu.
4. After this, tap on ‘Apply’ to execute the changes.
These steps will disable the NVIDIA PhysX GPU acceleration & all the physics computation will now be handled by CPU.
Read Also :How To Fix Nvidia Control Panel Missing In Windows 10, 8, 7?
2. How to create Optimus settings for a new program?
There are some applications that do not have the Optimus Application Profile. In that case, you can create one Optimus application program directly from the NVIDIA control panel settings.
1. On Windows Desktop, right-click and choose ‘NVIDIA Control Panel’ from the side menu.
2. From the left panel, select ‘Manage 3D Settings.
3. Now, choose ‘Program Settings’ label.
4. Press ‘Add’ button now.
5. After this, from the browse menu, select the application to create a profile for.
6. Now, select the preferred graphics processor to use from the drop-down menu.
3. How to override the default graphics processor for a program?
From NVIDIA Control Panel settings, you can override the default Optimus profile settings and instead, you can use another graphics processor that you choose.
1. On Windows Desktop, right-click and choose ‘NVIDIA Control Panel’ from the side menu.
2. Now from the Control Panel menu tray, tap ‘View’.
3. From the list, select ‘Add “Run with graphics processor” Option to Context Menu’.
These steps will allow you to select the graphics processor you want to use for particular application. You just have to right-click on the application, from context menu, go to ‘Run with graphics processor’ and select a processor, which is indicated in the screenshot given below.
Read Also :How To Update NVIDIA Display Driver To Latest Version
4. How to create custom resolution for monitor?
Custom resolution provides feature to allow you to virtually add the resolution that you want your display to be. For this, it is recommended monitor should be Microsoft plug n play monitor, which should support the newly set resolution. And the resolution set should be in the range of the graphic card as well.
Note: First, if your NVIDIA Control Panel is not in ‘Advanced Mode’, then from the top menu bar choose ‘View’. Now, in the drop-down menu, select ‘Advanced Mode’.
1. Epson tm t88iii model m129c drivers for mac. From the NVIDIA Control Panel navigation, in Display, press Change resolution.
2. Now, choose the icon, which represents the display monitor whose resolution you want to change.
3. Press the ‘Customize’ button to get a Customize window.
4. After this, from the Customize window, choose label ‘Create Custom Resolution…’.
Note: If this is the first time you are accessing this panel, the it will display a license agreement. Once you accept, it will take you to the ‘Create Custom Resolution’ window.
5. In Create Custom Resolution, fill in the fields with the values of resolution you want for your display. Then press the ‘Test’ button, which will allow the graphics card to query the display and verify if the new custom mode is supported. If the custom resolution set by you is not supported, then the test will fail and you won’t be able to add this new custom resolution.
Caution: This function can cause system damage & will cancel the warranty of the product.
5. How to change the SLI focus display?
For full screen 3D applications, SLI focus display will allow you to choose the monitor that is able to receive maximum SLI 3D acceleration.
SLI focus display can be configured in three ways from the NVIDIA control panel settings:
1. From the Windows Vista/Win7 Display Properties Control Panel, assign the primary monitor.
2. From the NVIDIA Control Panel, go to Set up multiple displays page, and assign the primary monitor.
3. From the Control Panel, go to Set SLI configuration page, and choose SLI focus display.
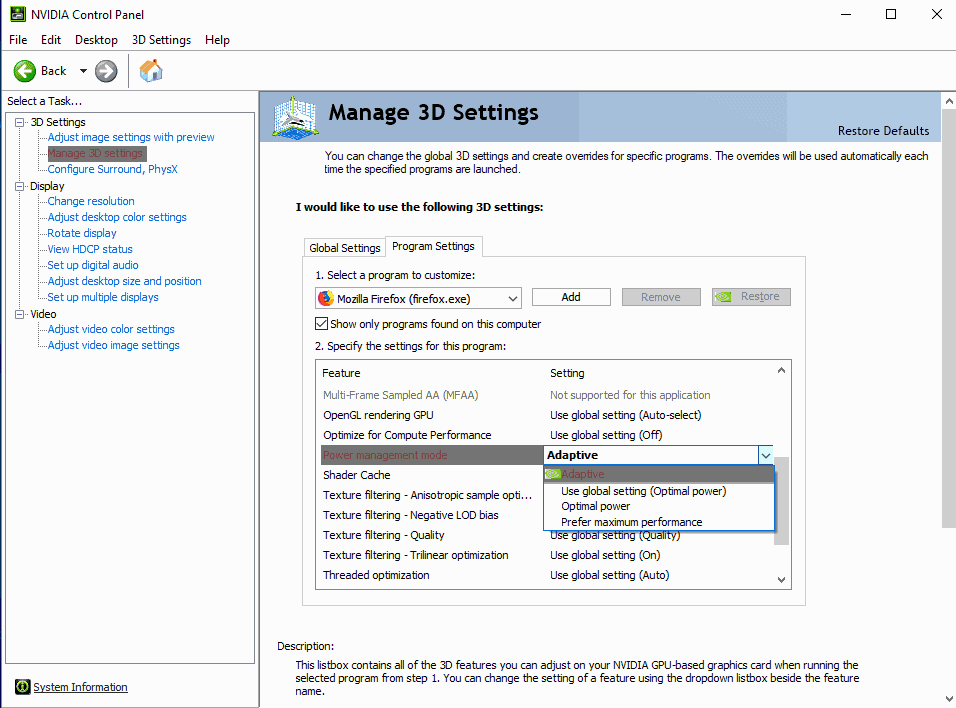
6. How to set ‘Power management mode’ from Adaptive to Maximum Performance?
This setting will improve the performance of certain applications in case when the GPU throttles the clock speed incorrectly.
Follow the steps given below to execute this setting:
1. On Windows Desktop, right-click and choose ‘NVIDIA Control Panel’ from the side menu.
2. From the left panel, select ‘Manage 3D settings’.
3. Now, in Global settings tab, go to Power Management mode drop down menu, and choose ‘Prefer Maximum Performance’.
4. After this, press ‘Apply’ button to execute the changes.
All these above given methods are strictly for NVIDIA Graphics Processing Units (GPU).
Download brian tracy maximum achievement workbook pdf. Download Maximum Achievement by Brian Tracy PDF Book Download PDF eBook. Name of writer, number pages in ebook and size are given in our post. Check here and also read some short description about Maximum Achievement by Brian Tracy PDF Book Download. Tracy, Brian. Maximum achievement: strategies and skills that will unlock your hidden powers to succeed/Brian Tracy. Achievement motivation. Self-actualization (psychology). Motivation (psychology). BF503.T73 1993 158'.I-dc CIP ISBN-13: 978-0-671-86518-4. Download Maximum Achievement by Brian Tracy PDF Free, self-help, self-management, psychology, techniques to improve your life through self-esteem.
By performing the methods, you will be able to make your system work better with less load on the processor.
Read Also : How to Fix Compatibility Issues Of A Graphic Card Driver
If you found this helpful, please let us know. You can also drop your feedback in the comments section below.
- Author: admin
- Category: Category
There are times when we want to change our default settings to the ones we want, to improve the graphic representation and performance of our system.
Well, I'm not an expert, but I'm assuming since the NVIDIA Control panel only shows 3d settings, it's not utilizing my dGPU. Secondly, when I use my alienware graphics amplifier with an external monitor attached while using my laptop monitor at the same time, and go to display settings to view the two different monitors settings, I press 'Detect' and it says it cannot detect multiple monitors.
Today, in this article, we well be talking about some of the best NVIDIA Control Panel settings on Windows, to improve the systems performance in various ways.
Starting now!
Best NVIDIA Control Panel Settings For Windows 10, 8, 7
1. How to Disable NVIDIA PhysX GPU acceleration?
NVIDIA PhysX is an intelligent physics real-time engine that comes with more than 150 games and is used by a lot of developers. This middleware engine provides a boost to the physics processing power that makes gaming physics more effective.
But, if you are playing a game on low processor with a good GPU, you should disable the NVIDIA PhysX from the control panel, to decrease the load from the processor.
Here are the steps for disabling NVIDIA PhysX GPU acceleration from control panel:
1. On Windows Desktop, right-click and choose ‘NVIDIA Control Panel’ from the side menu.
2. Now, from 3D settings on left side, select ‘Set PhysX configuration’.
3. Now on the right panel, in option ‘Select a PhysX processor’, choose ‘CPU’ from the drop-down menu.
4. After this, tap on ‘Apply’ to execute the changes.
These steps will disable the NVIDIA PhysX GPU acceleration & all the physics computation will now be handled by CPU.
Read Also :How To Fix Nvidia Control Panel Missing In Windows 10, 8, 7?
2. How to create Optimus settings for a new program?
There are some applications that do not have the Optimus Application Profile. In that case, you can create one Optimus application program directly from the NVIDIA control panel settings.
1. On Windows Desktop, right-click and choose ‘NVIDIA Control Panel’ from the side menu.
2. From the left panel, select ‘Manage 3D Settings.
3. Now, choose ‘Program Settings’ label.
4. Press ‘Add’ button now.
5. After this, from the browse menu, select the application to create a profile for.
6. Now, select the preferred graphics processor to use from the drop-down menu.
3. How to override the default graphics processor for a program?
From NVIDIA Control Panel settings, you can override the default Optimus profile settings and instead, you can use another graphics processor that you choose.
1. On Windows Desktop, right-click and choose ‘NVIDIA Control Panel’ from the side menu.
2. Now from the Control Panel menu tray, tap ‘View’.
3. From the list, select ‘Add “Run with graphics processor” Option to Context Menu’.
These steps will allow you to select the graphics processor you want to use for particular application. You just have to right-click on the application, from context menu, go to ‘Run with graphics processor’ and select a processor, which is indicated in the screenshot given below.
Read Also :How To Update NVIDIA Display Driver To Latest Version
4. How to create custom resolution for monitor?
Custom resolution provides feature to allow you to virtually add the resolution that you want your display to be. For this, it is recommended monitor should be Microsoft plug n play monitor, which should support the newly set resolution. And the resolution set should be in the range of the graphic card as well.
Note: First, if your NVIDIA Control Panel is not in ‘Advanced Mode’, then from the top menu bar choose ‘View’. Now, in the drop-down menu, select ‘Advanced Mode’.
1. Epson tm t88iii model m129c drivers for mac. From the NVIDIA Control Panel navigation, in Display, press Change resolution.
2. Now, choose the icon, which represents the display monitor whose resolution you want to change.
3. Press the ‘Customize’ button to get a Customize window.
4. After this, from the Customize window, choose label ‘Create Custom Resolution…’.
Note: If this is the first time you are accessing this panel, the it will display a license agreement. Once you accept, it will take you to the ‘Create Custom Resolution’ window.
5. In Create Custom Resolution, fill in the fields with the values of resolution you want for your display. Then press the ‘Test’ button, which will allow the graphics card to query the display and verify if the new custom mode is supported. If the custom resolution set by you is not supported, then the test will fail and you won’t be able to add this new custom resolution.
Caution: This function can cause system damage & will cancel the warranty of the product.
5. How to change the SLI focus display?
For full screen 3D applications, SLI focus display will allow you to choose the monitor that is able to receive maximum SLI 3D acceleration.
SLI focus display can be configured in three ways from the NVIDIA control panel settings:
1. From the Windows Vista/Win7 Display Properties Control Panel, assign the primary monitor.
2. From the NVIDIA Control Panel, go to Set up multiple displays page, and assign the primary monitor.
3. From the Control Panel, go to Set SLI configuration page, and choose SLI focus display.
6. How to set ‘Power management mode’ from Adaptive to Maximum Performance?
This setting will improve the performance of certain applications in case when the GPU throttles the clock speed incorrectly.
Follow the steps given below to execute this setting:
1. On Windows Desktop, right-click and choose ‘NVIDIA Control Panel’ from the side menu.
2. From the left panel, select ‘Manage 3D settings’.
3. Now, in Global settings tab, go to Power Management mode drop down menu, and choose ‘Prefer Maximum Performance’.
4. After this, press ‘Apply’ button to execute the changes.
All these above given methods are strictly for NVIDIA Graphics Processing Units (GPU).
Download brian tracy maximum achievement workbook pdf. Download Maximum Achievement by Brian Tracy PDF Book Download PDF eBook. Name of writer, number pages in ebook and size are given in our post. Check here and also read some short description about Maximum Achievement by Brian Tracy PDF Book Download. Tracy, Brian. Maximum achievement: strategies and skills that will unlock your hidden powers to succeed/Brian Tracy. Achievement motivation. Self-actualization (psychology). Motivation (psychology). BF503.T73 1993 158'.I-dc CIP ISBN-13: 978-0-671-86518-4. Download Maximum Achievement by Brian Tracy PDF Free, self-help, self-management, psychology, techniques to improve your life through self-esteem.
By performing the methods, you will be able to make your system work better with less load on the processor.
Read Also : How to Fix Compatibility Issues Of A Graphic Card Driver
If you found this helpful, please let us know. You can also drop your feedback in the comments section below.